Picture Advancement
Instructions to Improve Pictures for Web and Execution
image Optimize
The most effective method to Enhance Pictures for Web and Execution
Brian Jackson, September 22, 2023
Upgrade pictures for web
List of chapters
The Advantages of Designing Your Pictures
How To Upgrade Pictures for Web and Execution?
Picture Streamlining Modules You Can Utilize
Streamline Pictures for Web Contextual analysis
Utilizing SVGs: The Advantages You Want To Be aware
Best Practices for Enhancing Pictures for the Internet
Download article as PDF
Close
Trust us, you don’t believe that Google should can’t stand your site. Luckily, you can diminish your picture’s record sizes to assist with working on your site’s exhibition.
One issue with organizing them is that alterations frequently lessen their quality (which thusly could make the guest can’t stand your site). That is not something terrible as long as you don’t make them appalling.
There are a few stunts and methods that let you diminish the picture’s record size yet keep them sufficiently pretty to show them on your site gladly.
So we should investigate how to arrange your pictures without making them appalling, as well as how to advance pictures for web and execution.
What’s the significance here to Enhance Pictures?
Enormous pictures delayed down your pages which makes a not exactly ideal client experience. Streamlining pictures is the most common way of diminishing their document size, utilizing either a module or content, which thus accelerates the heap season of the page. Lossy and lossless pressure are two strategies regularly utilized.
Look at Our Video Manual for Improving Pictures for Website optimization
Play video
The Advantages of Arranging Your Pictures
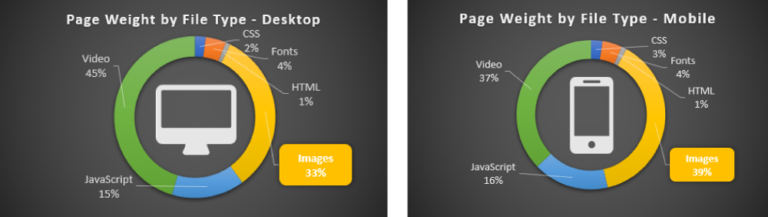
In the first place, for what reason do you have to organize your pictures? What are the advantages? There are various advantages of advancing your pictures for execution. As indicated by HTTP Chronicle, pictures make up on normal 21% of an all out website page’s weight. So with regards to enhancing your site, after video content, pictures are by a long shot the primary spot you ought to begin!
It’s a higher priority than contents and text styles. Furthermore, unexpectedly, a decent picture streamlining work process is one of the simplest things to carry out, yet a ton of site proprietors disregard this.
Normal Bytes Per Page (KB)
Normal Bytes Per Page (KB)
Here is a glance at the fundamental advantages:
It will further develop your page stacking speed (see our contextual analysis beneath for the amount it influences your speed). Assuming that your page takes excessively lengthy to stack your guests could become weary of delaying and continue on toward something different. For more data about improving your page stacking time see our top to bottom page speed advancement guide.
Joined with an extraordinary Search engine optimization WordPress module it works on your Website design enhancement. Your site will rank higher in web search tool results. Huge scrapes delayed down your site and web search tools can’t stand slow destinations. Google is additionally prone to slither and list your pictures quicker for Google picture search. Inquisitive about which level of your traffic comes from Google picture search? You can utilize a Google Investigation WordPress module or section to check Google picture search traffic.
Making reinforcements will be quicker.
More modest picture document sizes utilize less data transmission. Organizations and programs will see the value in this.
Requires less extra room on your server (this really relies on the number of thumbnails you that advance)
As a Kinsta client, you can profit from picture improvement for nothing by empowering programmed picture enhancement with only a couple of snaps. We’ll go into this more underneath.
Resize pictures in Imagify
Resize pictures in Imagify
Imagify likewise packs pictures on their outsider servers, not yours, which is vital with regards to execution. Imagify shouldn’t dial back your WordPress site.
2. Optimole
Optimole
Optimole module
Optimole is a picture enhancement WordPress module that consequently lessens your pictures’ size with practically no work expected on your end. It enjoys a major benefit with regards to your site’s stacking speed as it is completely cloud-based and never serves pictures that are greater than they ought to, otherwise known as it shows the ideal picture size for the guest’s viewport and program.
Besides, the module gives languid stacking and productive picture substitution – it minimize the picture quality on the off chance that the guest has a more slow web association – which makes it stand apart from the group. It additionally consequently identifies the client’s program and serves WebP assuming that it’s upheld.
Every one of the pictures that Optimole packs are served through a quick CDN. You can attempt Optimole for nothing or move up to the superior arrangement in the event that you really want additional data transfer capacity and handling space.
3. Optimus Picture Analyzer
optimus picture analyzer
Optimus Picture Streamlining agent module
The Optimus WordPress Picture Streamlining agent utilizes lossless pressure to upgrade your pictures. Lossless means you won’t see any quality misfortune. It upholds WooCoomerce and multi-site and has a pleasant mass improvement highlight for those with currently enormous existing media libraries. It likewise is viable with the WP Retina WordPress module. There is a free and premium rendition. In the superior variant you pay once yearly and you can pack a limitless measure of pictures. On the off chance that you consolidate it with their Reserve Empowering influence module you can likewise plunge into WebP pictures, which is another lightweight picture design from Google.
Lessen your heap time by 49% with Edge Reserving
Edge Reserving conveys your site’s pages to your guests quicker and relieves your server’s burden. Included free in all WordPress plans!
Find out more
4. WP Smush
wp smush module
WP Smush module
WP Smush has both a free and premium form. It will lessen the concealed data from pictures to decrease the size without diminishing quality. It will check pictures and diminish them as you transfer them to your site. It will likewise check pictures that you’ve previously transferred and lessen those as well. It will build smush up to 50 documents on the double. You can likewise physically smush assuming you need. It will smush JPEG, GIF, and PNG picture types. Record sizes are restricted to 1MB.
It’s viable with probably the most well known media library modules like WP All Import and WPML.
All picture streamlining is finished with lossless pressure strategies, keeping your picture quality high.
It doesn’t make any difference which registry you save your pictures in. Smush tracks down them and packs them.
Smush has a choice to consequently set width and level for all pictures, so each of your pictures get resized to indistinguishable extents.
5. TinyPNG (likewise compacted JPGs)
tinypng
TinyPNG module
TinyPNG utilizes the TinyJPG and TinyPNG administrations (the free record allows you to pack around 100 pictures each month) to improve your JPG and PNG pictures. It will consequently pack new pictures and mass packs your current pictures. It will switch CMYK over completely to RBG to save space. It will pack JPEG pictures up to 60% and PNG pictures up to 80% without a noticeable misfortune in picture quality. It doesn’t have a document size limit.
6. ImageRecycle
imagerecycle pdf picture pressure module
ImageRecycle – Picture and PDF enhancer module
The ImageRecyle module is a programmed picture and PDF enhancer. This module centers around picture pressure as well as PDFs also. One truly convenient element is the capacity to set the base record size for pressure. For instance, assuming you have pictures that are 80 KB in size, you can have it consequently reject them from pressure. This guarantees pictures and records are never packed excessively. It likewise incorporates mass streamlining and auto picture resizing. Note: They have a free 15-day preliminary, however this is a superior help, and pictures are transferred and packed utilizing their servers. They don’t charge each month, but instead by the complete number of pictures packed, beginning at $10 for 10,000.
7. EWWW Picture Streamlining agent
EWWW Picture Streamlining agent module
EWWW Picture Streamlining agent
The EWWW Picture Streamlining agent assists you with making your pictures more modest and your site quicker with less issue. With no size cutoff points and a lot of adaptability for cutting edge clients, you can utilize the defaults or modify the module totally as you would prefer.
The free mode permits limitless JPG pressure and WebP change and is perfect for side interest destinations or web journals that are simply beginning. All EWWW IO clients can utilize the Mass Analyzer to pack their current pictures or utilize the Media Library list mode to single out unambiguous pictures to pack. Extra organizers can be filtered to ensure each and every picture on your site is appropriately enhanced.
EWWW IO even permits you to change over your pictures into cutting edge designs like WebP or find the best picture design for a picture with multi-design transformation choices.
The top notch Pack Programming interface permits you to take the pressure to an unheard of level without forfeiting quality and normal reserve funds of half. It additionally opens PDF pressure and incorporates advantageous 30-day picture reinforcements. With the discretionary Simple IO CDN, pictures are naturally compacted, scaled to fit the page and gadget size, lethargic stacked, and switched over completely to the cutting edge WebP design.
Enhance Pictures for Web Contextual analysis
We concluded to do our own little contextual investigation and tests to show you exactly how much enhancing your pictures for the web can influence your WordPress website’s general speed.
Uncompressed JPGs
We originally transferred 6 uncompressed JPGs, which were all more than 1 MB in size, to our test site. We then ran 5 tests through Pingdom and took the normal. As you can see from the speed test underneath, our all out load time was 1.55 seconds and the absolute page size was 14.7 MB.
speed test uncompressed jpg
Speed test with uncompressed JPGs
Packed JPGs
We then, at that point, compacted the JPGs utilizing the Imagify WordPress module, utilizing the “forceful setting.” We then ran 5 tests through Pingdom and took the normal. As you can see from the speed test beneath, our all out load time was decreased to 476 ms and the complete page size was diminished to 2.9 MB. Our complete burden times were diminished by 54.88% and page size was diminished by 80.27%.
speed test packed jpg
Speed test with packed JPGs
There is practically no other advancement you can make on your site that will get you more than half reduction in load times. To that end picture enhancement is so significant, the interaction above was completely computerized by the module. It’s a hands-off way to deal with a quicker WordPress site.
The main other sensational enhancement you could make would be switching around your hosts. Numerous clients that transition to Kinsta see more than 45% speed increments. Envision moving to Kinsta and advancing your pictures!
By enhancing your pictures, whether it is utilizing a photograph altering device or a WordPress module, you can likewise fix the “Streamline pictures” cautioning you get in Google PageSpeed Experiences (as displayed beneath.)
pagespeed experiences advance pictures
PageSpeed Experiences advance pictures cautioning
Assuming that you have other advancement admonitions from speed test apparatuses, try to look at our post on Google PageSpeed Bits of knowledge and our inside and out Pingdom walkthrough.
Play video
We’ve taken our insight into powerful site the executives at scale, and transformed it into a digital book and video course. Snap to download The Manual for Overseeing 60+ WordPress Destinations!
Utilizing SVGs: The Advantages You Really want To Be aware
Another suggestion is to utilize SVG records close by your different pictures. SVG is a versatile vector design which turns out perfect for logos, symbols, text, and straightforward pictures. The following two or three justifications for why:
SVGs are consequently versatile in the two programs and photograph altering apparatuses. This makes for a web and visual creators dream!
Google lists SVGs, the same way it does PNGs and JPGs, so you don’t need to stress over Website design enhancement.
SVGs are customarily (not consistently) more modest in that frame of mind than PNGs or JPGs. This can bring about quicker load times.
Genki composed an extraordinary article where he looks at the size of SVG versus PNG versus JPEG. The following are a couple of important points from his testing where he looked at the three changed picture types.
JPG (enhanced size: 81.4 KB)
JPG size
JPG picture
PNG (enhanced size: 85.1 KB)
PNG size
PNG picture
SVG (enhanced size: 6.1 KB)
SVG size
SVG picture
As you can see over, the SVG is a reduction in record size of 92.51% when contrasted with the JPG. Also, when contrasted with the PNG, 92.83%. Look at our instructional exercise on the best way to utilize SVGs on your WordPress site.
Best Practices for Upgrading Pictures for the Internet
Here are a few general prescribed procedures when the main thing is the way to streamline pictures for web:
If utilizing a WordPress module, utilize one that packs and enhances pictures remotely on their servers. This, thusly, diminishes the heap on your own site.
Use vector pictures at whatever point conceivable close by your PNGs and JPGs.
Utilize a CDN to present your pictures quick to guests across the globe. The Kinsta CDN has a code minification include that is constructed straightforwardly into the MyKinsta dashboard. This permits Kinsta clients to empower programmed CSS and JavaScript minification with a straightforward snap without any problem.
Eliminate pointless picture information.
Crop the void area and reproduce it by utilizing CSS to give the cushioning.
Use CSS3 impacts however much as could be expected.
Save your pictures in the legitimate aspects. Despite the fact that recall WordPress currently upholds responsive pictures to serve them up without resizing them with CSS.
Continuously use .ico document design for your favicon.
Use web text styles as opposed to setting text inside pictures – they look better when scaled and take less space.
Use raster pictures just for scenes with heaps of shapes and subtleties.
Decrease the piece profundity to a more modest variety range.
Utilize lossy pressure where conceivable.
Trial to track down the best settings for each arrangement.
Use GIF on the off chance that you really want activity. (in any case, pack your

PAGE SIZE CHECKER
How To Advance Pictures for Web and Execution?
The essential objective of organizing your pictures is to find the harmony between the most reduced record size and an adequate quality.
There is more than one method for performing practically these enhancements. One of the most famous ways is to just pack them prior to transferring to WordPress. Normally, this should be possible in a device like Adobe Photoshop or Partiality Photograph. A portion of these errands can likewise be performed utilizing modules, which we will go into more underneath.
The two essential interesting points are the document arrangement and sort of pressure you use. By picking the right blend of record arrangement and pressure type you can decrease your picture size by as much as multiple times. You’ll need to try different things with each picture or record arrangement to see what works best.
Pick the Right Record Arrangement
Be careful with Pressure Quality versus Size
Figure out Lossy versus Lossless Improvement
Use Picture Streamlining Apparatuses and Projects
Resize Pictures to Scale
1. Pick the Right Document Configuration
Before you begin adjusting your pictures, ensure you’ve picked the best record type. There are a few sorts of documents you can utilize:
PNG – produces greater pictures, yet in addition has a bigger document size. Was made as a lossless picture design, despite the fact that it can likewise be lossy.
JPEG – utilizes lossy and lossless enhancement. You can change the quality level for a decent equilibrium between quality and document size.
GIF – just purposes 256 tones. It’s the most ideal decision for vivified pictures. It just purposes lossless pressure.
There are a few others, like JPEG XR and WebP, yet they’re not generally upheld by all programs. In a perfect world, you ought to involve JPEG or JPG for pictures with loads of variety and PNG for straightforward pictures.
(Proposed perusing: JPG versus JPEG: Understanding the Most Widely recognized Picture Document Configuration)
2. Be careful with Pressure Quality versus Size
Here is an illustration of what can happen you pack a picture excessively. The first is utilizing an exceptionally low pressure rate, which brings about the greatest (however bigger document size). The second is utilizing an extremely high pressure rate, which brings about an exceptionally bad quality picture (yet more modest record size). Note: The first picture immaculate is 2.06 MB.
low pressure top notch jpg
Low pressure (top caliber) JPG – 590 KB
high pressure bad quality jpg
High pressure (bad quality) JPG – 68 KB
As you can see the principal picture above is 590 KB. That is enormous for one photograph! It is for the most part best on the off chance that you can hold a page’s all out weight under 1 or 2 MB in size. 590 KB would be a fourth of that as of now. The subsequent picture clearly looks terrible, however at that point it is just 68 KB. What you believe that should do is make a fair compromise between your pressure rate (quality) and the record size.
So we took the picture again at a medium pressure rate and as you can see beneath, the quality looks great now and the record size is 151 KB, which is OK for a high-goal photograph. This is practically 4x more modest than the first photograph with low pressure. Regularly less difficult pictures like PNGs ought to be under 100 KB or less for best execution.
medium pressure mid-range quality jpg
Medium pressure (incredible quality) JPG – 151 KB
3. Figure out Lossy versus Lossless Improvement
It is likewise critical to comprehend that there are two kinds of pressure you can utilize: lossy and lossless.
Lossy: This is a channel that takes out a portion of the information. This will corrupt the picture, so you’ll must watch out for the amount to lessen the picture. The document size can be decreased overwhelmingly. You can utilize instruments like Adobe Photoshop, Partiality Photograph, or other picture editors to change the quality settings of a picture. The model we utilized above is utilizing lossy pressure.
Lossless: This is a channel that packs the information. This doesn’t diminish the quality yet it will require the pictures to be uncompressed before they can be delivered. You can play out a lossless pressure on your work area utilizing instruments like Photoshop, FileOptimizer, or ImageOptim.
It’s ideal to try different things with your pressure methods to see what turns out best for each picture or configuration. On the off chance that your apparatuses have the choice ensure you save the picture for web. This is a choice in many picture editors and will give you the quality changes so you can perform ideal pressure. You’ll lose a portion of the quality, so trial to find the best equilibrium you can without making the pictures terrible.
4. Use Picture Streamlining Apparatuses and Projects
There are a great deal of instruments and projects out there, both premium and free, that you can use to enhance your pictures.
Some give you the apparatuses to play out your own improvements and others accomplish the work for you. We seriously love Liking Photograph, as it is modest and gives you practically indistinguishable elements to that of Adobe Photoshop.
proclivity photograph
Packing photograph in Fondness Photograph
Here are a few extra instruments and projects to look at:
Adobe Photoshop
Gimp
Paint.NET
GIFsicle
JPEG Smaller than expected
OptiPNG
pngquant
FileOptimizer
ImageOptim
Trimage
ImageResize.org
Kinsta’s Picture Enhancement include
Remember that your techniques for serving pictures are similarly all around as significant as record size. Numerous exceptional hosts like Kinsta carry out a CDN to convey pictures and different records to clients quickly. Kinsta’s free Cloudflare joining safeguards all destinations on the stage, as well, making it both quick and secure.
5. Resize Pictures to Scale
In the past it was vital that you transfer pictures to scale and not let CSS resize them. In any case, this is presently not as significant since WordPress 4.4 now upholds responsive pictures (not downsized by CSS).
Fundamentally, WordPress naturally makes a few sizes of each picture transferred to the media library. By including the accessible sizes of a picture into a srcset quality, programs can now decide to download the most proper size and overlook the others. See an illustration of what your code really resembles beneath.
srcset responsive pictures model in code
srcset responsive pictures model in code
So with an ever increasing number of HiDPI shows these days, hammering out a fair compromise can be great. Say 2x or 3x your site’s segment or div size, yet at the same time not exactly the first size. The program will show the right one in light of the goal of the gadget.
The WordPress media library makes thumbnails in view of your settings. Be that as it may, the first is as yet held and immaculate. To resize your pictures and save circle space by not saving the first, you can utilize a free module like Imsanity.
wordpress media settings
WordPress media settings
Imsanity permits you to set a mental stability limit so that all transferred pictures will be obliged to a sensible size which is even more than huge enough for the necessities of a commonplace site.
Imsanity guides into WordPress following the picture transfer, yet before WordPress handling happens. So WordPress acts the very same in all ways, with the exception of it will be as though the patron had scaled their picture to a sensible size prior to transferring.
Clean Your Media Library
In the event that you are searching for a device to save space while likewise tidying up your media library, you could utilize Media Cleaner to find unused media records. The module will check every one of your media documents and rundown unused ones in the Media Cleaner Dashboard so you can peruse and erase them.
Media Cleaner carries out a brilliant destroying framework: when documents are erased, they are moved to a waste catalog. Like that, you can test your site for some time and ensure all is great. In the event that a document or media passage is missing, you can undoubtedly reestablish it with a tick or basically void the junk if all looks great to you.
Picture Enhancement Modules You Can Utilize
Fortunately, with WordPress, you don’t need to do the entirety of the designing or pressure manually. You can utilize modules to naturally do in any event a portion of the work for you.
There are a few modules that will naturally streamline your picture records as you transfer them. They’ll try and improve pictures that you’ve proactively transferred. This is a helpful element – particularly in the event that you as of now have a site loaded up with pictures. Here is a glance at probably the best modules to design your pictures for better execution.
It is significant however that you don’t exclusively depend on the actual modules. For instance, you ought not be transferring 2 MB pictures to your WordPress media library. This can bring about gobbling up your web host’s circle space super quick.
The best technique is to rapidly resize the picture in a photograph altering device in advance, and afterward transfer it and utilize one of the accompanying modules to decrease it further.
Prior to focusing on one of these apparatuses or modules, however, you ought to check to be certain that your web have supplier doesn’t offer inherent devices to accomplish the work for you. For instance, Kinsta clients approach a free Picture Improvement include that consequently makes upgraded duplicates of all WordPress pictures, which are put away for nothing. The more modest of the two picture documents is then presented utilizing Kinsta’s lightning-quick CDN to help speed considerably further. Clients could pick among lossless and lossy pressure contingent upon their necessities.
Imagify Picture Streamlining agent
Optimole
Optimus Picture Streamlining agent
WP Smush
TinyPNG (likewise compacted JPGs)
ImageRecycle
EWWW Picture Streamlining agent
1. Imagify Picture Streamlining agent
imagify picture streamlining agent
Imagify Picture Streamlining agent module
Imagify is made by a similar group who created WP Rocket, which a large portion of you are presumably acquainted with. It is WooCommerce, NextGen Exhibition, and WP Retina viable. It likewise has a mass enhancement element and you can pick between three distinct degrees of pressure, typical, forceful, and ultra. It has a reestablish include too, so in the event that you are discontent with the quality you can a single tick reestablish and once again pack at a level which better suits your necessities. There is a free and a top notch form. You are restricted to a portion of 25 MB of pictures each month with a free record.
Disposing of the first picture and resizing your bigger pictures should likewise be possible with th
PAGE SIZE CHECKER
Resize pictures in Imagify
Resize pictures in Imagify
Imagify likewise packs pictures on their outsider servers, not yours, which is vital with regards to execution. Imagify shouldn’t dial back your WordPress site.
2. Optimole
Optimole
Optimole module
Optimole is a picture enhancement WordPress module that consequently lessens your pictures’ size with practically no work expected on your end. It enjoys a major benefit with regards to your site’s stacking speed as it is completely cloud-based and never serves pictures that are greater than they ought to, otherwise known as it shows the ideal picture size for the guest’s viewport and program.
Besides, the module gives languid stacking and productive picture substitution – it minimize the picture quality on the off chance that the guest has a more slow web association – which makes it stand apart from the group. It additionally consequently identifies the client’s program and serves WebP assuming that it’s upheld.
Every one of the pictures that Optimole packs are served through a quick CDN. You can attempt Optimole for nothing or move up to the superior arrangement in the event that you really want additional data transfer capacity and handling space.
3. Optimus Picture Analyzer
optimus picture analyzer
Optimus Picture Streamlining agent module
The Optimus WordPress Picture Streamlining agent utilizes lossless pressure to upgrade your pictures. Lossless means you won’t see any quality misfortune. It upholds WooCoomerce and multi-site and has a pleasant mass improvement highlight for those with currently enormous existing media libraries. It likewise is viable with the WP Retina WordPress module. There is a free and premium rendition. In the superior variant you pay once yearly and you can pack a limitless measure of pictures. On the off chance that you consolidate it with their Reserve Empowering influence module you can likewise plunge into WebP pictures, which is another lightweight picture design from Google.
Lessen your heap time by 49% with Edge Reserving
Edge Reserving conveys your site’s pages to your guests quicker and relieves your server’s burden. Included free in all WordPress plans!
Find out more
4. WP Smush
wp smush module
WP Smush module
WP Smush has both a free and premium form. It will lessen the concealed data from pictures to decrease the size without diminishing quality. It will check pictures and diminish them as you transfer them to your site. It will likewise check pictures that you’ve previously transferred and lessen those as well. It will build smush up to 50 documents on the double. You can likewise physically smush assuming you need. It will smush JPEG, GIF, and PNG picture types. Record sizes are restricted to 1MB.
It’s viable with probably the most well known media library modules like WP All Import and WPML.
All picture streamlining is finished with lossless pressure strategies, keeping your picture quality high.
It doesn’t make any difference which registry you save your pictures in. Smush tracks down them and packs them.
Smush has a choice to consequently set width and level for all pictures, so each of your pictures get resized to indistinguishable extents.
5. TinyPNG (likewise compacted JPGs)
tinypng
TinyPNG module
TinyPNG utilizes the TinyJPG and TinyPNG administrations (the free record allows you to pack around 100 pictures each month) to improve your JPG and PNG pictures. It will consequently pack new pictures and mass packs your current pictures. It will switch CMYK over completely to RBG to save space. It will pack JPEG pictures up to 60% and PNG pictures up to 80% without a noticeable misfortune in picture quality. It doesn’t have a document size limit.
6. ImageRecycle
imagerecycle pdf picture pressure module
ImageRecycle – Picture and PDF enhancer module
The ImageRecyle module is a programmed picture and PDF enhancer. This module centers around picture pressure as well as PDFs also. One truly convenient element is the capacity to set the base record size for pressure. For instance, assuming you have pictures that are 80 KB in size, you can have it consequently reject them from pressure. This guarantees pictures and records are never packed excessively. It likewise incorporates mass streamlining and auto picture resizing. Note: They have a free 15-day preliminary, however this is a superior help, and pictures are transferred and packed utilizing their servers. They don’t charge each month, but instead by the complete number of pictures packed, beginning at $10 for 10,000.
7. EWWW Picture Streamlining agent
EWWW Picture Streamlining agent module
EWWW Picture Streamlining agent
The EWWW Picture Streamlining agent assists you with making your pictures more modest and your site quicker with less issue. With no size cutoff points and a lot of adaptability for cutting edge clients, you can utilize the defaults or modify the module totally as you would prefer.
The free mode permits limitless JPG pressure and WebP change and is perfect for side interest destinations or web journals that are simply beginning. All EWWW IO clients can utilize the Mass Analyzer to pack their current pictures or utilize the Media Library list mode to single out unambiguous pictures to pack. Extra organizers can be filtered to ensure each and every picture on your site is appropriately enhanced.
EWWW IO even permits you to change over your pictures into cutting edge designs like WebP or find the best picture design for a picture with multi-design transformation choices.
The top notch Pack Programming interface permits you to take the pressure to an unheard of level without forfeiting quality and normal reserve funds of half. It additionally opens PDF pressure and incorporates advantageous 30-day picture reinforcements. With the discretionary Simple IO CDN, pictures are naturally compacted, scaled to fit the page and gadget size, lethargic stacked, and switched over completely to the cutting edge WebP design.
Enhance Pictures for Web Contextual analysis
We concluded to do our own little contextual investigation and tests to show you exactly how much enhancing your pictures for the web can influence your WordPress website’s general speed.
Uncompressed JPGs
We originally transferred 6 uncompressed JPGs, which were all more than 1 MB in size, to our test site. We then ran 5 tests through Pingdom and took the normal. As you can see from the speed test underneath, our all out load time was 1.55 seconds and the absolute page size was 14.7 MB.
speed test uncompressed jpg
Speed test with uncompressed JPGs
Packed JPGs
We then, at that point, compacted the JPGs utilizing the Imagify WordPress module, utilizing the “forceful setting.” We then ran 5 tests through Pingdom and took the normal. As you can see from the speed test beneath, our all out load time was decreased to 476 ms and the complete page size was diminished to 2.9 MB. Our complete burden times were diminished by 54.88% and page size was diminished by 80.27%.
speed test packed jpg
Speed test with packed JPGs
There is practically no other advancement you can make on your site that will get you more than half reduction in load times. To that end picture enhancement is so significant, the interaction above was completely computerized by the module. It’s a hands-off way to deal with a quicker WordPress site.
The main other sensational enhancement you could make would be switching around your hosts. Numerous clients that transition to Kinsta see more than 45% speed increments. Envision moving to Kinsta and advancing your pictures!
By enhancing your pictures, whether it is utilizing a photograph altering device or a WordPress module, you can likewise fix the “Streamline pictures” cautioning you get in Google PageSpeed Experiences (as displayed beneath.)
pagespeed experiences advance pictures
PageSpeed Experiences advance pictures cautioning
Assuming that you have other advancement admonitions from speed test apparatuses, try to look at our post on Google PageSpeed Bits of knowledge and our inside and out Pingdom walkthrough.
Play video
We’ve taken our insight into powerful site the executives at scale, and transformed it into a digital book and video course. Snap to download The Manual for Overseeing 60+ WordPress Destinations!
Utilizing SVGs: The Advantages You Really want To Be aware
Another suggestion is to utilize SVG records close by your different pictures. SVG is a versatile vector design which turns out perfect for logos, symbols, text, and straightforward pictures. The following two or three justifications for why:
SVGs are consequently versatile in the two programs and photograph altering apparatuses. This makes for a web and visual creators dream!
Google lists SVGs, the same way it does PNGs and JPGs, so you don’t need to stress over Website design enhancement.
SVGs are customarily (not consistently) more modest in that frame of mind than PNGs or JPGs. This can bring about quicker load times.
Genki composed an extraordinary article where he looks at the size of SVG versus PNG versus JPEG. The following are a couple of important points from his testing where he looked at the three changed picture types.
JPG (enhanced size: 81.4 KB)
JPG size
JPG picture
PNG (enhanced size: 85.1 KB)
PNG size
PNG picture
SVG (enhanced size: 6.1 KB)
SVG size
SVG picture
As you can see over, the SVG is a reduction in record size of 92.51% when contrasted with the JPG. Also, when contrasted with the PNG, 92.83%. Look at our instructional exercise on the best way to utilize SVGs on your WordPress site.
Best Practices for Upgrading Pictures for the Internet
Here are a few general prescribed procedures when the main thing is the way to streamline pictures for web:
If utilizing a WordPress module, utilize one that packs and enhances pictures remotely on their servers. This, thusly, diminishes the heap on your own site.
Use vector pictures at whatever point conceivable close by your PNGs and JPGs.
Utilize a CDN to present your pictures quick to guests across the globe. The Kinsta CDN has a code minification include that is constructed straightforwardly into the MyKinsta dashboard. This permits Kinsta clients to empower programmed CSS and JavaScript minification with a straightforward snap without any problem.
Eliminate pointless picture information.
Crop the void area and reproduce it by utilizing CSS to give the cushioning.
Use CSS3 impacts however much as could be expected.
Save your pictures in the legitimate aspects. Despite the fact that recall WordPress currently upholds responsive pictures to serve them up without resizing them with CSS.
Continuously use .ico document design for your favicon.
Use web text styles as opposed to setting text inside pictures – they look better when scaled and take less space.
Use raster pictures just for scenes with heaps of shapes and subtleties.
Decrease the piece profundity to a more modest variety range.
Utilize lossy pressure where conceivable.
Trial to track down the best settings for each arrangement.
Use GIF on the off chance that you really want activity. (in any case, pack your
꽁머니 커뮤니티✔️꽁타✔️ggongta.com [포토] 훈련 지켜보는 염경엽 감독 : 네이트 스포츠 – 네이트 뉴스
Somebody essentially help to make significantly articles Id state This is the first time I frequented your web page and up to now I surprised with the research you made to make this actual post incredible Fantastic job
Your articles are a source of inspiration.
Nice blog here Also your site loads up very fast What host are you using Can I get your affiliate link to your host I wish my site loaded up as quickly as yours lol
Your depth of understanding on this topic is impressive.
เว็บไซต์เราเป็นแพลตฟอร์มที่ช่วยให้ผู้ใช้สามารถแลกเปลี่ยนไลค์และติดตามกันได้อย่างปลอดภัยและมีประสิทธิภาพเว็บไซต์ของเราไม่มีส่วนทำให้บัญชีเฟสบุ๊คของท่านเสียหายหรือมีสแปมแต่อย่างใดหากสมาชิกท่านไหนที่พบปัญหาในการใช้งานสามารถติดต่อทีมงานได้ทางแฟนเพจของเว็บไซต์เราตลอด 24 ชั่วโมง ระบบของเราใช้งานง่ายและฟรี
Абсолютно трендовые новости мира fashion.
Исчерпывающие эвенты всемирных подуимов.
Модные дома, торговые марки, haute couture.
Новое место для трендовых хайпбистов.
https://ullafashion.ru/
https://ullafashion.ru/